
NEW YORK (CNN/Money) I'm pretty handy around the house. I also happen to be a geek. So, you'd think I'd jump right into a project that involved both screwdrivers and video drivers.
But, somehow, the thought of building a PC from scratch intimidated me.
Maybe it was high goals I had set. Or maybe it was the freaky alphabet soup contained in the guides stuff like BIOS, CMOS, SATA and IDE. But with a little patience, some basic reading skills and a Phillips-head screwdriver, I was not only able to build my dream machine, I had a blast doing it.
 |
|
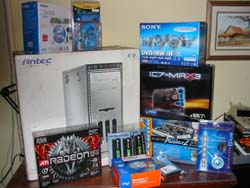
| Believe it or not, converting this... |
And I'm convinced that it's something anyone can do.
This won't be a step-by-step guide. There are plenty of those around the Web and at bookstores. But I can offer a few tips for first-time builders that will help make the process a little easier.
A little disclosure: While this was my first true build-from-scratch machine, it wasn't the first time I've put together a PC. I've got two Shuttle 'mini' PCs under my belt. Most of the hard work is already done with a Shuttle barebones kit. You only have to install the processor, RAM, hard drive and CD-ROM. And the kits, which start around $169, come with illustrated step-by-step instructions. Even luddites can build a fully functional machine within a couple of hours.
For this experiment, though, I wanted something more. I was looking for an uber-gaming rig something that would still be relevant years from now. While I was building a geek dream machine, the minor frustrations I encountered are the same ones any first time do-it-yourselfer might face.
 |
|
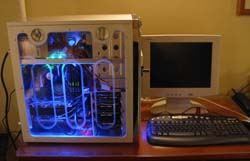
| ...to this was actually an easy process. |
First things first: The least expensive product isn't necessarily the best choice. My case (an Antec Performance One P160) retails for about $120 not the cheapest, by a long shot. It did, however, have a sleek, appealing design. And more importantly, it came with an easy-to-understand, extremely helpful manual, which guided me through the construction process.
Working hand-in-hand with that was the manual that came with my motherboard (the main circuit board to which you attach your processor, video card and more). I chose Abit's IC7-MAX3 ($184 and up). It's a top-of-the-line board with features that are ideal for gamers (and overclockers folks who coax a little extra power out of their processors). Standard motherboards run anywhere from $55 to $100 and should handle all you demand of them. Respected brand names include Abit, Asus and Gigabyte.

With a good manual from your case manufacturer and motherboard maker in hand, you'll have most of your questions answered.
For those lingering quandries, the Internet is your friend. Since I built my machine over a weekend, the technical assistance lines of the companies whose products I chose were closed. Rather than waiting for them to reopen two days later, I hopped online and popped into the forums of [H]ardOCP and The Tech Report, two notable hardware Websites.
Within minutes, other users had politely answered my newbie questions.
Installing the processor was a snap. Popping in the RAM was even easier. (RAM memory is one of the most important components of your machine. The more you've got, the faster programs will operate. I went overboard, installing 2 GB of Corsair TWINX1024-4000Pro. Did I mention I'm a geek?)
Corsair has a strong reputation in the gaming community and is very friendly to overclocking (something I hope to attempt down the road). It's expensive, though. 1 GB of the RAM I chose costs over $300. For standard machines, 512MB of generic RAM should be more than sufficient and can be found for $63 or so online.
The video card and sound card fit nicely in their slots with no trouble. And the only trouble getting my DVD burner installed was negotiating the tight space inside the PC case. If you've got large hands, building your own computer can be a bit frustrating. (Another word of warning: Take breaks while doing this. I spent so much time staring down into the machine that I walked away with a nasty crick in my neck on my first day.)
All totaled, I probably invested about 10 hours or so putting my uber-gaming rig together, but I ended up with a first class machine that will easily stand up to the demands of anything the PC world can throw at it for years to come. I was also able to add the bells and whistles I wanted to see, like internal lighting and a clear side panel. Heck, I could put fuzzy dice in the machine if I felt like it. That's something you can't get with a pre-ordered machine.
By building myself, I saved fair amount, too. A custom gaming machine from Alienware, Voodoo or Falcon Northwest would cost me anywhere from $700 to $1,200 more than the price of the components I used. More importantly, though, I was able to take pride in knowing I'd made a high-quality PC all by myself.

Morris, when he's not tinkering, is Director of Content Development for CNN/Money. Click here to send him an email.
|